STATUS: RELEASED
… It is increasingly recognized that the design of the CRF or eCRF is a key quality step in ensuring the data required by the protocol, regulatory compliance and/or safety needs/ comments, study scientific-specific hypothesis attributes, site work flow, and cross-checking of data items within a form or across different forms are addressed. (Clinical data management: Current status, challenges, and future directions from industry perspectives)
A Case Report Form (CRF) is a structured document used to capture information about study participants. When this process is conducted electronically, the form is referred to as an electronic Case Report Form (eCRF). The use of eCRFs offers several advantages: it facilitates efficient data storage, reduces the risk of human error and saves time throughout the study lifecycle. In this step, we will focus on how to design and develop an eCRF in preparation for data collection.
Short description
Capturing clinical data plays a vital role in health research. Traditionally, this information was recorded on paper case report forms (CRFs) and later manually entered into a database. Today, however, data is increasingly collected directly using electronic case report forms (eCRFs) within electronic data capture (EDC) systems. This shift has significantly improved the quality and reduced the costs associated with data collection.
A variety of EDC platforms are available to support clinical data capture. Most Dutch University Medical Centres (UMCs) hold site licences for one or more of these platforms. Use of these platforms is mandatory for research that falls under Good Clinical Practice (GCP) as defined in the ICH E6(R3) guideline and the NFU also indicates that their use is mandatory for all WMO research within the Netherlands as specified in its guideline on the quality assurance of human subject research. Commonly used systems in the Netherlands include Castor EDC and REDCap. These tools offer a wide range of functionalities, including real-time data validation during entry, integrated questionnaires, study planning modules, streamlined import/export processes and monitoring features that promote data quality and regulatory compliance. Some of these functionalities also support the efficient design of eCRFs, which is the key focus of this page.
This page provides guidance on the design of eCRFs, including considerations before creating one, and best practices to keep in mind while to ensure high data quality and reliability.
Why is this step important
Properly designing your eCRF is important for a variety of reasons:
- Improved data quality. The quality of the eCRF will greatly influence the quality of the collected data. A well designed eCRF reduces human errors, leading to more accurate and reliable data collection.
- Interoperability of data. Using standardised and reusable definitions to build these eCRFs, makes the collected data easier to integrate and compare across studies and systems.
- Facilitates reuse of eCRF. High quality eCRFs can be reused by other researchers, saving time and promoting consistency across studies.
- Supports reproducibility. eCRFs often function as a codebook (sometimes also referred to as data dictionary), helping to document how data was collected and structured which is essential for reproducible research.
How to
Step 1 - Clarify your role and responsibilities
Your tasks will differ depending on your role:
- Researcher. Focus on what needs to be collected. If you lack technical experience, collaborate early with a data manager or system expert to translate your needs into a workable form structure.
- Data manager. If you’re not familiar with the subject matter, sit with the researcher early and often. Clarify key variables and the scope of the project (e.g. single-center or multi-center study) and ensure consistent use of terms and units.
Knowing who does what prevents last-minute misunderstandings.
The example used throughout the How to guide is based on the VASCA codebook. For simplicity, only a single item is shown, with three response options.
A data manager has been asked by a researcher to build an electronic Case Report Form (eCRF). They sit together to discuss the requirements. The researcher wants to collect data on the item “Rare disease’s diagnosis” using the following response options:
- Vascular tumor with associated anomalies
- Non-involuting congenital hemangioma
- Cutis marmorata telangiectatica congenita
Step 2 - Understand your EDC system
Each EDC (Electronic Data Capture) system has its own quirks, limitations and strengths. Before you start building, invest time in learning how your EDC works.
Are you already familiar with the system? If not, consider:
- Asking colleagues or local specialists for guidance
- Following a short training or tutorial
- Reviewing example forms or templates available in the system
- Knowing the tool well will help you avoid workarounds or pitfalls later.
To get more familiar with Castor EDC, the data manager decides to follow several courses from the Castor academy. Similar resources are available for REDCap.
Step 3 - Define your data with your FAIRification goals in mind
Before building your eCRF, start by developing the codebook. The codebook serves as the blueprint for your forms: it defines the data you intend to collect, specifies how that data should be structured and, where applicable, outlines how it maps to external standards or ontologies to support FAIRification. A codebook should be set up in such a way that data analysis can be performed without any knowledge of the eCRF
Start by clarifying your goals for the data:
- If your goal is data sharing, integration, or reuse, you’ll need to design your codebook with more structure and metadata from the outset. This can include mapping the data elements to ontologies, but also: will I follow a data model or reuse common data elements.
- If your aim is internal analysis only, a lightweight and pragmatic codebook may suffice.
Also see Metroline step: Apply common data elements for more information.
3.1 - Reuse data elements where possible
Before defining anything from scratch, check if suitable definitions already exist.
- Search for Common Data Elements (CDEs) in domain-specific libraries (e.g. CDISC, NIH CDE Repository)
- Explore ontologies like SNOMED, LOINC, HPO or OBO for standardised concepts
- Reuse existing codebooks or eCRFs from similar studies
Why reuse?
- Ensures interoperability and consistency
- Saves time and reduces ambiguity
- Makes your data easier to share, compare and pool
3.2 - Define your own data elements where needed
When study-specific variables are not covered by existing standards, define them carefully and consistently.
- Use clear, unambiguous labels. Write field labels that are easy to understand. Avoid negative phrasing, as it tends to confuse users (e.g. use “Has fever?” instead of “No fever?”). If using a validated questionnaire or standardised item, retain the original wording and clarify it within the eCRF interface if needed.
- Define data types and formats. Choose structured data types such as dates, integers or coded lists. Avoid free-text fields, which are harder to validate, reuse and analyse. Be explicit about formats: use ISO 8601 (YYYY-MM-DD) for dates, specify decimal separators (e.g. dot vs comma) and always include measurement units for numeric values.
- Specify value sets or coding schemes. Clearly list all expected response options (e.g. 1 = Male, 2 = Female, 9 = Unknown). Think about how you want to handle missing values. It is often good practice to make all fields required during data entry, but this creates the necessity for an escape. By including so-called NULL values in your options, a data entry person can specify why a value is missing. Coding for these values is often done with strings, such as “NI” for “No information”, or with negative numbers, such as -1 for “No information”. Moreover, consider adding terminology annotations from standards such as SNOMED CT, ICD or NCIT to enhance interoperability, but be aware that this can be time-consuming and complex. For internal use, local value sets may suffice, provided they are applied consistently.
- Record metadata and validation rules. Add context for each variable, including units of measurement, allowed ranges (e.g. age 0–120), and dependencies (e.g. “only ask if symptom = yes”).
To build the codebook, the researcher uses the elements as specified in the VASCA codebook, available in ART-DECOR. These elements are based on the VASCA Rare Disease Common Data Elements.
The researcher’s codebook contains:
| ID | Label | Label_code | Data type | Option_value | Option_code | Required |
|---|---|---|---|---|---|---|
| rare_disease_diagnosis | Rare disease diagnosis | SIO:001331 | ST | Vascular tumor with associated anomalies | http://www.orpha.net/ORDO/Orphanet_458827 | 1 |
| Non-involuting congenital hemangioma | http://www.orpha.net/ORDO/Orphanet_141179 | |||||
| Cutis marmorata telangiectatica congenita | http://www.orpha.net/ORDO/Orphanet_1556 |
Columns concerned with units, verifications, etc are left out, since they’re empty.
Step 4 - Build your form using good eCRF design practices
Once your codebook is ready, use it as the foundation for constructing your eCRF. The goal is not only technical accuracy, but also usability and robustness in practice.
- Group related fields logically. Organise fields by topic (e.g. demographics, lab values) or by visit/timepoint. Logical grouping improves data entry flow and reduces the risk of errors.
- Use conditional logic to reduce clutter. Show only questions that are relevant based on earlier responses (e.g. “If pregnant = yes, show gestational age”). This keeps forms concise and easier to navigate.
- Add input validation to catch errors early. Include range checks, date logic (e.g. visit date cannot be before birthdate), mandatory/optional status and formatting rules to improve data quality at the point of entry.
- Use clear instructions or tooltips. If a field label is ambiguous, provide help text or hover-over instructions. This is especially useful when the label must remain unchanged, such as with validated questionnaires or CDEs.
- Make units and permissible ranges visible. Even if defined in the codebook, display them next to the relevant field to avoid confusion (e.g. “Height (cm), 100–250”).
- Design for usability. Avoid long scrolling forms. Use tabs, page breaks or collapsible sections to improve navigation. Use radio buttons for short lists of options. For longer lists, prefer drop-down menus to reduce clutter. Moreover, you can tailor the design of your eCRF to the device used for data entry (e.g. computer vs. phone).
- Avoid multi-select fields where possible. Multi-selects are difficult to validate and analyse. Instead, consider using individual yes/no fields for each option or a series of checkboxes with clearly defined logic. If a multi-select is unavoidable, ensure the format is structured, downstream usage is well planned and consider adding the option “None of the options are applicable” to the multi-select.
- Use consistent layouts. Maintain a predictable layout and spacing throughout the form to enhance readability.
- Provide default values or examples. Where appropriate, use example values or defaults to speed up entry and reduce ambiguity.
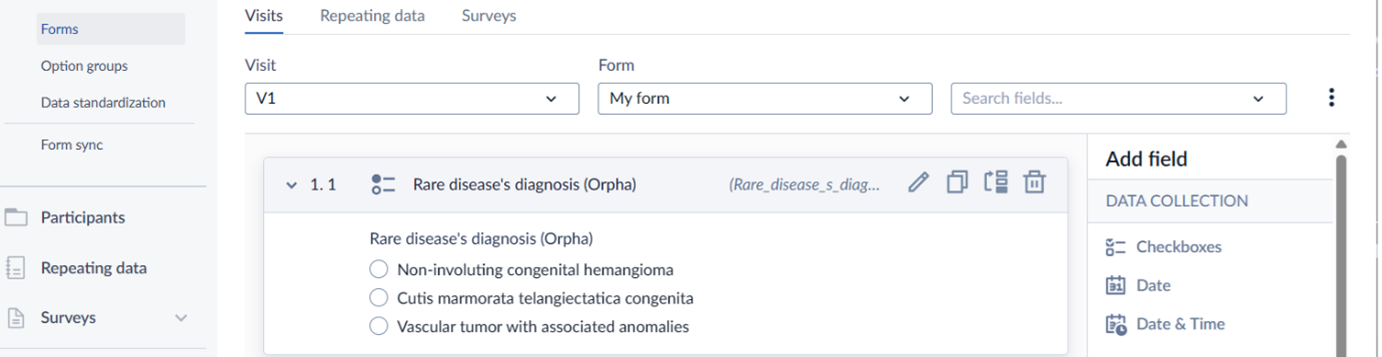
The data manager now implements the codebook items in Castor EDC.
"Rare disease’s diagnosis" is a single-select item. Since in this example it has only three options, a radio button is used. Note that the real list contains 63 options, which would make a dropdown more suitable.
See Special step 1 below to read how to add annotation for the "Rare disease’s diagnosis" field.
Step 5 - Testing the eCRFs
Once your eCRFs are built, they must be thoroughly tested before going live. Involve testers from different roles to ensure both technical accuracy and practical usability.
- Form builder. This person should be the first to test and verify that all elements are implemented correctly.** If the form includes validations, test edge cases carefully. If you can break your own form, others probably will too, even if unintentionally.
- Data entry personnel. A form that works technically may still be difficult to use in practice. Involve the people who will be entering data, such as research nurses, to check whether the form is intuitive and efficient. In multi-centre studies, include testers from different sites to uncover centre-specific issues.
- Data analyst. The person responsible for analysing the data should verify that the variables collected can be used for analysis without transformation issues, ambiguities or inconsistent formats.
Once you, or those responsible, are confident about the form’s integrity and usability, the study can go live.
The data manager tests the form and tells the researcher the form is ready. The researcher, who will be analysing the data, tests the forms and exports the dataset to inspect if the file(s) created are suitable for analysis. Furthermore, a research nurse who will be entering the data also tests the forms. Findings from any of these roles may indicate that changes to the eCRF design are needed to facilitate proper analysis and data entry.

Since everyone is pleased with the eCRF, they decide the study can go live and data collection begins.
Before going live and starting data collection, verify that the EDC study settings comply with regulatory and centre requirements. For example, for WMO studies it may be necessary to enable two-factor authentication and configure forms for (S)AEs or SUSARs.
Step 6 - Updating your eCRFs
After the study has started, continue supporting data entry by offering short training sessions. This is especially useful in multi-centre settings. Let personnel familiarise themselves with the eCRF using dummy data in a test site. Use this opportunity to gather feedback and clarify any misunderstandings.
As the study progresses, monitoring may reveal patterns such as fields being consistently left blank or incorrectly filled. These may indicate unclear instructions, design flaws or a mismatch between the form and actual workflows.
While adjustments may be necessary, modifying a live eCRF can have serious consequences. Changes may affect the protocol, data integrity, ethics approval and downstream analysis. Potential risks should be carefully assessed and, if required, changes should be managed through formal amendments. Plan for the possibility of data migration and revalidation. Whenever possible, make adjustments in a non-live copy of the study to prevent incidents and contamination of real data. Some systems offer dedicated functionality for this (for example, Castor’s FormSync). Always document changes thoroughly and communicate them clearly to all involved parties.
Special step 1 - Adding annotations in Castor EDC and REDCap
Castor EDC
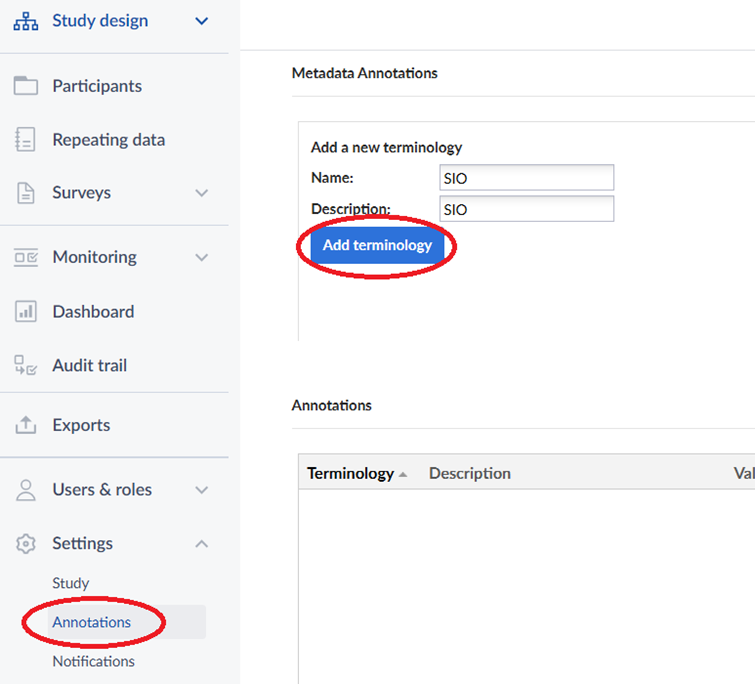
In Castor EDC an item’s terminology references can be added via the item’s “Data standardization”. Before you can do so, you first need to add the terminology in the Annotations section of the Settings:
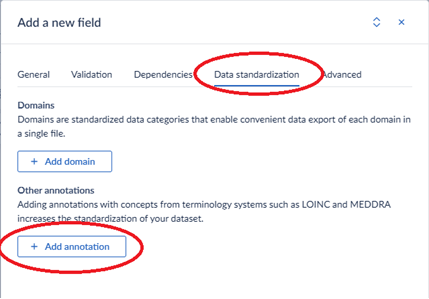
After adding the terminologies, go to the item’s data standardization tab to add annotations:
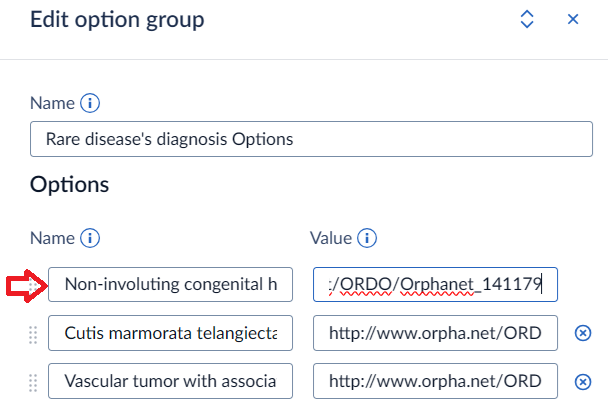
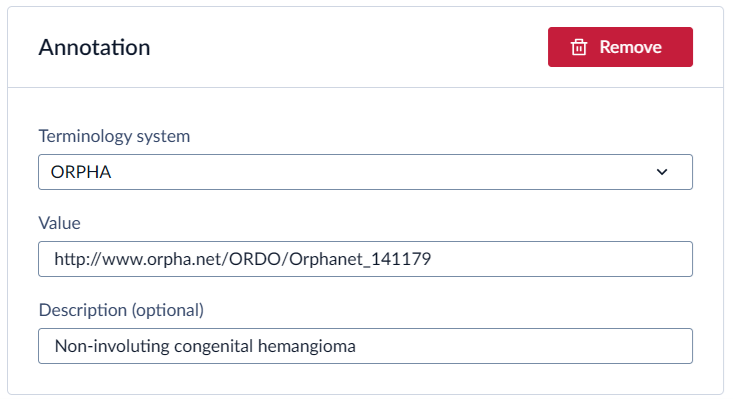
For example, to add the annotation for the “Rare disease’s diagnosis” from the VASCA codebook, add the following to the Castor field:
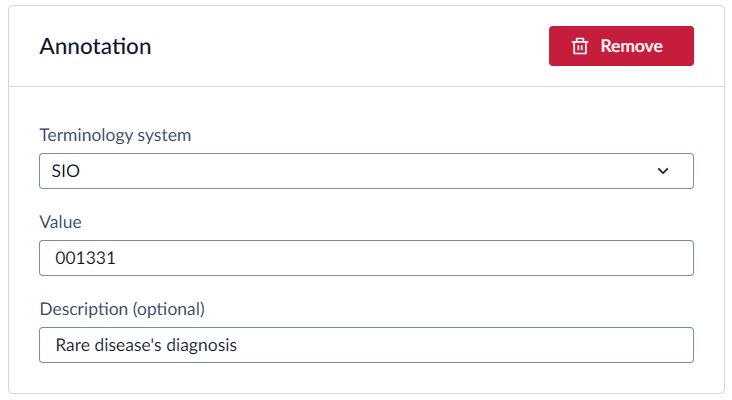
Castor does not specifically support adding annotations for the options. You can, however, add the annotations to the field. Make sure to use the option’s name as the annotation’s description so that you can link them together. For example:
and
By adding annotations to the Data Standardization tab, they are also automatically added to the Annotations section:
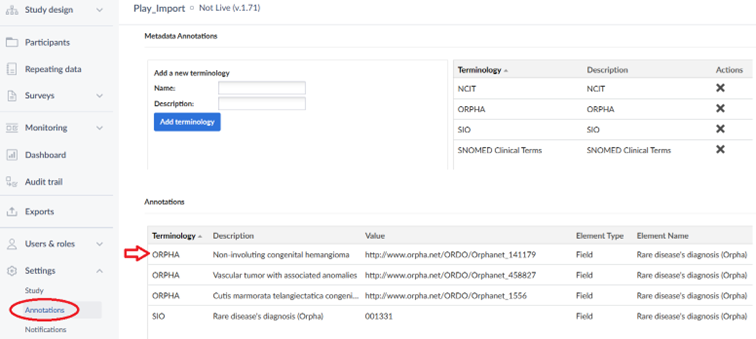
The annotations are included when you do an XML-export of your study structure.

For more information, see Castor’s helpdesk page.
REDCap
In REDCap, the mapping a field to a standard can be done using the “Action Tags / Field Annotation”. Field annotations in REDCap serve as internal notes or metadata for individual fields. They are not visible on any user-facing pages but can be retrieved through the Data Dictionary download or API metadata export.
These annotations are flexible in use, allowing users to document what a field represents, guide data entry or analysis, or map fields to external standards such as SNOMED, CDISC or LOINC. The notation format is unrestricted. Users may use simple codes or complex structures such as XML.
REDCap does not process these annotations automatically. Their purpose is entirely user-defined, which makes them a versatile tool for documentation, reference or standardisation as needed.
In REDCap options use the format of “code, label”. Hence, to add “Non-involuting congenital hemangioma - http://www.orpha.net/ORDO/Orphanet_141179”, this would be the expected format:

However, for its codes REDCap only supports integers and string containing letters, numbers and underscores. One method to avoid this is defining the choice as:

And then specify

Searching within a biomedical ontology
One interesting feature in REDCap is that you can add searching within a biomedical ontology for the Text box field type. When defining the field, you specify the service and then select an ontology:
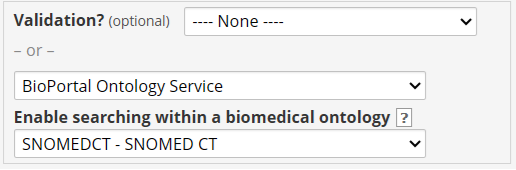
Now, when you enter data, you can select the item from the ontology’s list. For example, when searching for carcinoma:

Special step 2 - Tools to help you build eCRFs
- iCRF Generator. The iCRF Generator is a tool that generates eCRFs for various EDC systems such as Castor EDC and REDCap from codebooks published in ART-DECOR and OpenEHR. When codebooks are properly annotated, their annotations are incorporated into the generated CRFs in accordance with the methods described above.
- Codebook to Castor/LimeSurvey. Codebook to Castor/LimeSurvey. Developed by Amsterdam UMC, this tool converts an Excel-based codebook into a format compatible with RadboudUMC’s Castor Offline Design converter, which then generates a Castor-ready XML file. Nowadays, the tool also has limited LimeSurvey support. Currently, the tool is only available within Amsterdam UMC.
Expertise requirements for this step
Experts that may need to be involved, as described in Metroline Step: Build the Team, are described below.
- Researcher with domain knowledge. Specifies the items that need to be collected.
- Data steward with EDC knowledge/ data manager. Builds the forms in the EDC system. They are also in charge of setting up user access and offer technical help to researchers and ensure data integrity and regulatory compliance.
- FAIR data steward. Can support team in making eCRF more FAIR.
- Data entry person. Offers insight into what works and what doesn’t in real-world data collection settings, especially when interacting with patients. While not directly building the forms, their input helps ensure that the eCRF is user-friendly, clear and suitable for practical use.
Practical examples from the community
- VASCA registry. For more information see the following publications:
Training
- The EJPRD Workshop on the Implementation of a CDE Semantic Model for ERNs is fully available on GitHub.
Suggestions
This page has been written and reviewed by field experts through a rigorous process and has reached the “released” status. Learn more about the contributors here and explore the development process here. If you have any suggestions, visit our How to contribute page to get in touch or fill in our Quick feedback form.